Alright guys, let’s have a little chat about something that might seem minor but actually plays a huge role in your photography game: cleaning your camera lens.
Now, I know it might not be the most exciting topic, but trust me, if you want those sharp, crystal-clear images, keeping your lens clean is a must. You could have the fanciest camera with all the best settings, but if your lens is dirty, your photos will suffer, big time.
Ever wonder why some of your shots look foggy or dull, even though you’re sure you nailed the focus? Nine times out of ten, it’s a dirty lens that’s the culprit. And let’s be real, it’s so easy to get dust, fingerprints, or even some mysterious smudges on your gear.
Whether you’re an amateur just starting out or a seasoned pro, it happens to the best of us. But the good news is, it’s totally avoidable—with the right know-how, you can keep your lens spotless and your photos sharp.
Why You Need to Keep Your Camera Lens Clean
So, why should we be so obsessed with clean lenses? It’s simple: a clean lens means better images. Think about it like this: your lens is the window through which your camera sees the world.
If that window is dirty, cloudy, or covered in smudges, your photos will reflect that. You’ll end up with images that look dull, hazy, and less sharp than they could be.
Let me tell you a quick story. A while back, I was leading a photo walk (super fun, by the way), and a beginner photographer came up to me with a question. He was frustrated because all his shots looked blurry and kind of misty.
He couldn’t figure out what was going on—was it the camera? Was it his technique? So, I took a look at his camera, and when I popped off the lens cap, the issue was glaringly obvious: his front lens was covered in fingerprints and dirt.
I’m talking about smudges, dust, even a little something that looked like, well, maybe food? 😅
This poor guy had no idea how to clean his lens and was too scared to do it himself after spending a lot of money on his camera gear. Fortunately, I always carry my trusty cleaning kit, so we gave it a quick clean, and boom—the difference was night and day.
His next shot was crystal-clear, sharp, and vibrant, just the way it should be.
Moral of the story? A dirty lens can completely ruin an otherwise perfect shot, and it happens more often than you think. And guys, you don’t have to be afraid to clean your gear!
With the right tools and techniques, it’s super easy, and your camera will thank you for it.
How Dust Affects Your Photos
Now, let’s talk about dust. Ugh, dust. It is like the unwelcome guest showing up at every event.
Eventually, especially with regard to the lenses, dust will find its way onto your camera equipment regardless of your level of care. And let me not start on outside shots—that is, whether the day is windy at the beach or a dusty desert scene—there is simply no avoiding it.
What then does dust really do to your images? Well, where it lands determines this as well. Should it be on the front element of your lens, your photographs may show some softness or you may see some bothersome particles in the frame.
Things might get quite nasty, though, if dust accumulates on the rear element of your lens—that is, the component that links the camera body. Particularly in places with strong brightness, such as the background blur or bokeh, you will begin to see these odd, out-of-focus dots or halos in your pictures.
Trust me also; once you find them, you cannot unsee them.
But the truth is that, as a photographer, dust is simply a fact of life. The question is not if your lens will become dusty but when.
While some would advise you to completely avoid photographing in dusty conditions, come on—are you really going to miss that magnificent sunset shot simply because the air is somewhat dusty? No way at all The important is to get ready for it.
Keep your cleaning kit close at hand; try not to worry too much about a small dust accumulation here and there. You will be good as long as you routinely and meticulously clean your lens.
The Risks of Bad Lens Cleaning
Alright, therefore we have established that maintaining a clean lens is crucial. On the other hand, carelessness in cleaning your lens could cause more damage than benefit.
It’s like washing your car; if you use a dirty rag, you will simply harm the paint. That applies also to your camera lens. Although strong optical glass makes up camera lenses, they can nonetheless get scratched if incorrect cleaning agents are used.
For instance, if you grab a random towel or tissue to clean the lens and it turns out to have a small grain of sand or grit on it, congrats; you have just scratched your pricey glass. And once a lens is scratched, there is no reversing.
Using too much liquid cleaning is another often made error. Indeed, it would seem that more is better, but internal damage can result from moisture seeping into lens edges.
Moreover, using the incorrect kind of cleaning may remove the unique coatings on your lens meant to lower glare and enhance image quality. Basically, poor cleaning can destroy your lens, which is absolutely not what you want following all that equipment expenditure.
Protecting Your Lenses with Filters
To be honest, folks—your camera lenses are really valuable. Not only because they’re the secret to catching those amazing, picture-perfect moments, but also because they cost a fairly penny.
Protecting them is therefore rather vital, and one of the simplest approaches to do so is by applying protective filters.
You may be wondering now, “Do filters really make a difference?” Trust me; they do exactly that. Every single lens I own features a premium filter attached front.
Apart from separating the lens from the outside world—that is, dust, filth, unintentional fingerprints—it also saves me a lot of time in terms of cleaning.
The deal is this. Certain lenses include tiny grooves or threads directly by the front element, which draw all kinds of dirt. It’s a terrible hassle to keep clean since dust, little fabric fragments from your microfiber towel, even sand can collect within those grooves.
But if you pop on a protective filter, you’re basically concealing those bothersome small spots and producing a flat, smooth surface that’s far easier to maintain. Furthermore, should something happen to the filter—say, for example, it is broken or scratched—not too significant. You simply replace it; your lens stays safe and sound beneath.
Now some of you might be worried about image quality and believe a filter might distort your pictures, try not to worry about it. You would hardly notice any change, if any, as long as you are using good, multi-coated filters from companies like B+W or Hoya.
These high-quality glass filters won’t compromise your sharpness or create unwelcome glare since they are composed of Actually, I have shot lots with filters on, and the pictures are absolutely crisp.
It is thus advisable to invest in protective filters if you have not already done so. Consider it as a nominal cost for long-term protection of your cherished lenses and peace of mind.
Must-Have Tools for Cleaning Lenses
These tools not only get the job done but also ensure that you’re not causing any accidental damage to your precious gear.
Here’s my go-to list:
- Lens Cleaning Liquid:

Whether it’s Zeiss Liquid Lens Cleaner or Eclipse Optic Lens Cleaning Solution, these are my top picks. A couple of drops of this stuff can work wonders on smudges, fingerprints, and other stubborn marks. - Microfiber Cloth:
Never underestimate the power of a good microfiber cloth. I love the Visible Dust Magic Cleaner—it’s large enough to get the job done and won’t leave any streaks behind. - Lens Cleaning Tissues:

For those times when you want to be extra gentle, Tiffen Lens Cleaning Paper is a must. It’s soft and specifically designed for cleaning optical glass. - Rocket Blower:
If you haven’t got one of these, you’re seriously missing out. The Giotto’s Rocket Blower is amazing for blowing off dust and debris from your lens without ever touching the glass. Just a few puffs and your lens is dust-free! - Soft Brush or Toothbrush:
Sounds weird, right? But a soft brush, like an old toothbrush, is super handy for cleaning the rubber zoom or focus rings on your lens. Those areas can get pretty grimy, and a quick brush can make all the difference.
How to Clean Your Lens
Here’s a simple step-by-step guide that I follow every time I clean my lenses.
1. Start with the Exterior

Before you even think about cleaning the glass, take a moment to wipe down the outside of your lens. Dust and dirt can build up on the body, especially in the little cracks and crevices.
Use a slightly damp microfiber cloth to gently clean the exterior and the lens hood. For extra stubborn dirt on the rubber zoom and focus rings, grab that soft toothbrush we talked about earlier and give it a gentle scrub.
2. Blow Away the Dust

Next, use your rocket blower to puff away any loose dust or particles from the front and rear elements of your lens. This step is crucial because you don’t want to rub dust or dirt into the glass while cleaning—it can cause tiny scratches that add up over time.
3. Clean the Lens Mount

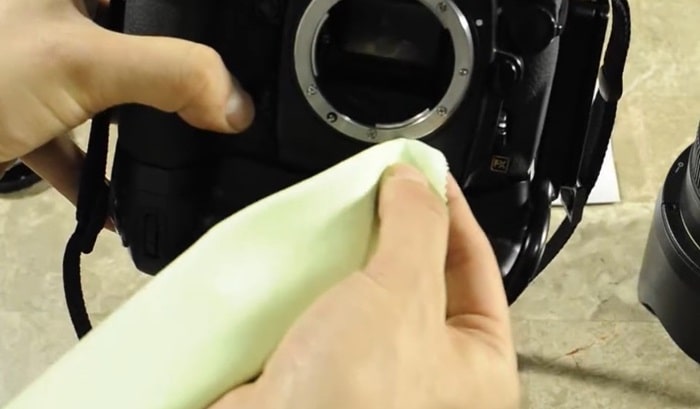
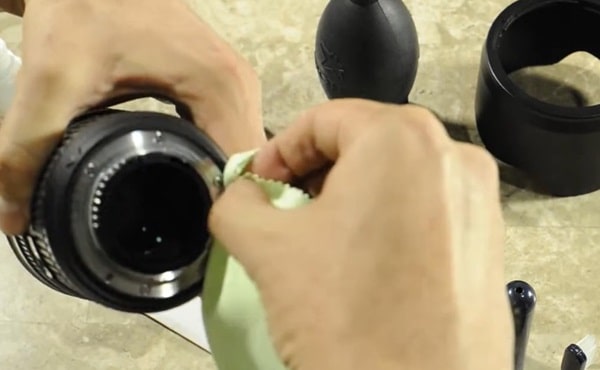
This is a step a lot of people forget, but it’s super important. The lens mount (the part of the lens that connects to your camera body) can get pretty dirty, too, and that dirt can easily transfer to your camera’s sensor if you’re not careful.
Take your microfiber cloth and a bit of cleaning solution, and gently wipe down the mount. Make sure to clean the contacts as well—those tiny metal points that communicate with your camera.
4. Clean the Front and Rear Elements
Now for the main event—the front and rear optical elements. Start by blowing off any remaining dust with your rocket blower.
Then, take a fresh piece of lens cleaning tissue or a clean microfiber cloth, and apply a drop or two of lens cleaning solution. Gently wipe the glass in small, circular motions, starting from the center and working your way out to the edges.
Be careful not to apply too much pressure, and don’t reuse the same cloth for the exterior and the glass—this can transfer dirt back onto the lens.
5. Final Check
Once you’ve finished cleaning, give the lens one last look to make sure there are no streaks, smudges, or particles left behind. If everything looks good, pop the protective filter back on (if you use one), and you’re all set!
Conclusion
So, what’s the takeaway here? Be gentle and be smart about how you clean your lenses. Use the right tools, like a microfiber cloth or lens tissue, and make sure you’re not using anything abrasive or too much liquid.
With the right technique, you can keep your lenses clean and scratch-free, so they last for years to come.

