Flash photography is like a secret weapon in the world of photography. When done right, it can transform even the most mundane scenes into something magical.
But here’s the thing—mastering flash is not always as easy as it looks. A lot of us, especially when starting out, tend to make some pretty common mistakes that leave us frustrated and wondering why our photos don’t turn out the way we envisioned.
If you’ve ever found yourself staring at your camera, confused about why the lighting looks so off or why your subjects end up with weird shadows or harsh highlights, you’re not alone.
Flash can be tricky, but the good news is that once you understand the most frequent mistakes and how to avoid them, you’ll be well on your way to creating stunning, well-lit photos.
So, whether you’re a beginner or just looking to improve your flash photography game, let’s dive into some of the most common errors photographers make with flash. Trust me, once you get these sorted out, your photos will level up big time!
Most Common Flash Photography Mistakes
1. Applied Any Automatic Camera Settings

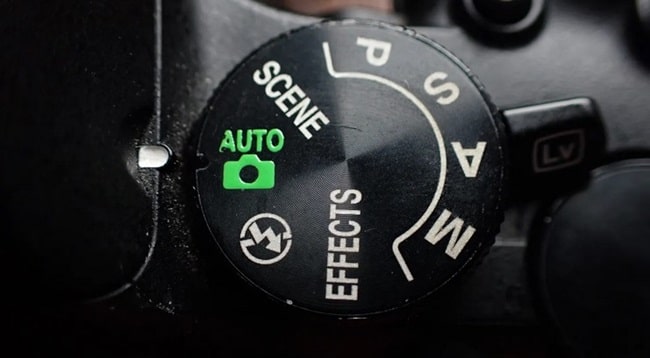
Using a flash and depending too much on automated camera settings is one of the biggest blunders photographers—especially beginners—do. Now, let me clear things: in many cases, automatic features like auto ISO or aperture priority can be lifesaving.
When you’re in a hurry, they let you rapidly acquire a good exposure—which is great. Conversely, with regard to flash photography? Not really.
Flash is rather different from other beasts, often the balance between ambient light and flash suffers when you let your camera run everything automatically. You can wind up with images either too dark, too brilliant, or simply lacking the ideal lighting touch you’re hoping for.
Hence, what then is the answer? Go manual! Indeed, first it seems frightening, but trust me; it’s well worth it. Manual mode lets you completely manage your camera settings, therefore helping you to balance the flash with the natural light and nail your exposure.
Once you get the hang of it, you will be able to modify parameters including aperture, shutter speed, and ISO to acquire the desired exact appearance. For the same reason—that provides more control and consistency—I personally also advise utilizing manual flash settings.
For macro photography with flash, for instance, I often begin with a setting like f/11, 1/200 of a second, ISO 200 with my flash output at ¼ power. This provides a strong basis from which I modify things like flash power or aperture in response to the lighting environment.
2. Keep the Flash On on the Camera
Alright, this one is absolutely major. Have you ever shot a flash picture and got that terrible “deer in the headlights?”.
You know, your subject appears flat, and their eyes are brilliant red; the overall picture has no depth or dimension. That most likely results from your keeping your flash exactly on top of the camera.
While some circumstances call for an on- camera flash, most of the time it does not help your pictures. The issue is that the flash produces strong illumination, little shadows, and no visual interest when it points exactly as the camera.
The Correction is Move that flash away from camera! Whether you use a chord or a wireless trigger, simply getting your flash even a few feet from the camera will greatly enhance the appearance of your pictures.
Your photographs gain complexity and character when you suddenly have control over the shadow locations. You also have far more artistic leeway to play about with lighting configurations.
Now, there are still techniques to improve the effect even if you’re limited with an on-camera light. Try bounce flash, in which case you soften the light by aiming the flash toward a wall or ceiling.
Alternatively distribute the light and minimize the strong shadows with a diffuser. It’s still a big improvement from blasting direct flash at your subject, even if it’s not as good as an off-camera flash.
3. Failing to Diffuse the Flash
Regarding strong light—this leads us to the second typical error: failing to diffuse the flash. Your flash images have deep shadows and too brilliant highlights if you have ever questioned why; most likely, this is due to too direct and harsh light.
Flash produces an extremely concentrated, strong light without any diffraction that might readily overwhelm your scene.
A diffuser is essentially a device to soften and distribute the light from your flash therefore reducing its harshness. It may be anything from a basic pop-up diffuser to even a white piece of fabric.
The shadows get softer and the general lighting seems more natural and balanced when you diffuser the flash.
If you do not have a dedicated diffuser, do not panic; there are various approaches to get comparable benefits. Particularly if you are filming indoors, one approach is to bounce the light off a reflecting surface—such as a white wall or ceiling.
This distributes the light so that it strikes your subject from a much softer and more pleasing angle.
In either case, the intention is to prevent that strong, direct light screaming “flash photo!” Trust me; your images will look lot better with a small diffusion.
4. Failure to Think About Other Light Sources
Using a flash allows you total control over the light in your pictures, which is among the hippest aspects about it. To create exactly the effect you wish, change the brightness, position, and light direction.
The caveat is that, if you ignore other light sources in your surroundings, they could mess with your shot.
Consider how the lighting in your picture might be affected by natural light from the sun, above indoor lights, or even a nearby lamp. If you’re not careful, these additional light sources may produce odd reflections, unwelcome shadows, or even color casts that distort the whole picture.
How then should one handle it? Your flash can help you to overwhelm the ambient light. You might accomplish this by adjusting the flash power, closing your aperture, or orienting the flash toward your subject.
This means that any ambient light is reduced and your flash takes front stage as the main source.
To produce a more realistic, mixed image, you may rather work with the ambient light and balance it with your flash. The secret is to know how the several light sources interact and change your settings in line.
For instance, you might wish to use a lesser flash power and let the sunshine fill in the rest if you are shooting outside on a sunny day.
In either case, the key is to notice every light source in your picture and choose how you wish to exploit or reduce them. Ignoring them could have unexpected effects; nobody wants such!
5. Not Stopping down Your Aperture
If you have been performing flash photography for some time, you may have come across circumstances whereby your images come out overly brilliant—that is, with blatantly overexposed images.
Although you might have tried cutting the flash power to resolve it, here’s the reality: that’s not always the best answer.
Regarding flash, your aperture is much more important than the flash power determining the brightness of your pictures. One common error is not enough stopping your aperture.
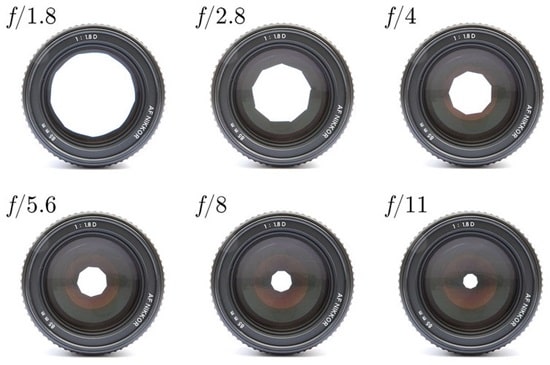
Keeping your aperture wide open—say f/2.8 or f/4—you are allowing in too much light from the flash and any ambient sources, therefore rendering everything excessively brilliant.

What then is the corrected approach? Limit that aperture! Stopping down your aperture lowers the light hitting your camera sensor—think about f/8, f/11, or even smaller.
In bright settings like sunny days or snowy landscapes when the natural light is already somewhat strong, this is extremely helpful. It will not only counter the exposure but also provide better focus across more of your scene.
Increase the flash strength if you are concerned about losing light from your flash after aperture narrowing. Although at first it may seem contradictory, often the best way to manage your exposure is by adjusting the aperture rather than merely adjusting the flash itself.
Thus, consider aperture first, then flash second, the next time your images come out excessively brilliant. The degree of greater control you acquire over your last shot will astounds you.
6. Thinking of Shutter Speed in the Traditional Sense
Let’s face it, most of us are trained to think about shutter speed as the tool that controls light and motion blur in photography. Usually, if you want to let in more light, you slow down the shutter speed.
If you want to freeze motion, you speed it up. Easy, right? Well, not so fast (pun intended) when it comes to flash photography!
Here’s where things get a bit tricky: with flash, there are two exposures happening at once. You’ve got the flash exposure, which is super quick and happens in a fraction of a second, and then you’ve got the ambient light exposure, which is controlled by your shutter speed.
The big thing to understand is that shutter speed doesn’t affect how your flash lights up your subject—it only affects how much ambient light is captured.
So, if you’re shooting in a dark room and relying entirely on flash, you could use a shutter speed of 1/200 of a second or even 30 seconds, and the part of the photo lit by the flash would look the same in both cases. Crazy, right?
However, in scenes where you’re mixing flash with natural light or other ambient sources, that’s when shutter speed becomes super important.
A faster shutter speed (like 1/200) will darken the background and minimize ambient light, while a slower speed (like 1/30) will brighten it up and might even introduce some motion blur in the background while your subject stays frozen.
The magic of flash is that it allows for creative combinations—like capturing a perfectly sharp subject with a cool motion-blurred background, all thanks to the interplay between shutter speed and flash duration.
So, the next time you’re setting your shutter speed, remember: it’s all about balancing the ambient light, not the flash.
7. Capturing Horrid White Balance
Oh, white balance—if you’ve ever looked at a photo and wondered why everything has a weird blue or orange tint, you’re not alone. White balance can be tricky, and when you throw a flash into the mix, things can get even weirder.
A lot of photographers make the mistake of assuming that the camera’s automatic white balance will handle everything perfectly when using flash. But that’s not always the case.
Different flashes, diffusers, or even the environment (like a green leaf or a colored wall) can cause major color casts, making your photo look off.
Maybe your subject’s skin tones come out looking cold and bluish, or perhaps the whole scene has a strange warm glow.
So, how do you fix it? First, if you want to avoid funky color issues, try setting a custom white balance for your flash setup. Most cameras have this option, and all you need is a white reference point (like a sheet of paper) to calibrate it.
This way, your camera knows exactly what “white” should look like in that specific lighting situation.
Another lifesaver is shooting in RAW format. RAW files give you the flexibility to adjust white balance in post-processing without losing any image quality.
If your photo looks too warm or too cool, you can easily tweak the white balance in software like Lightroom or Photoshop to get it just right.
Trust me, taking a few extra steps to get the white balance under control will make a huge difference in the overall quality of your flash photos. No one wants their beautiful portraits or macro shots ruined by weird color casts, right?
8. Using a Bad Focus Light
If you’ve ever tried to focus in a dimly lit environment, you probably know the struggle of trying to get your camera to lock onto the subject. This is where a focus light comes in handy.
It helps you see and focus on your subject in low-light conditions, making it a must-have for flash photography, especially for genres like macro.
But here’s the kicker—not all focus lights are created equal. A bad focus light can cause more problems than it solves.
For example, if the light is too bright or harsh, it can create unwanted reflections or throw off the color balance of your photo. Worse yet, some focus lights use a strobe effect (flickering too quickly for the human eye to notice), which can mess with your camera’s live view, making it hard to compose your shot or focus accurately.
To avoid these issues, you want a focus light that’s adjustable and can be dimmed to the right level. Ideally, it should emit a constant, non-flickering light so that your camera can focus smoothly without interference.
Testing out your focus light in different scenarios is also a good idea to make sure it doesn’t cause any weird effects.
In short, a good focus light can be your best friend in low-light flash photography. Just make sure you choose wisely, and it’ll help you nail those tricky shots every time!
Conclusion
Flash photography might seem intimidating at first, but once you get the hang of it, it opens up a whole world of creative possibilities.
By understanding and avoiding these common mistakes—like relying on automatic settings, neglecting to diffuse your flash, or overlooking the importance of controlling other light sources—you’ll be well on your way to capturing beautifully lit, professional-looking photos.
Whether you’re shooting portraits, macro, or any other subject, mastering flash techniques will give you the control and versatility you need to elevate your photography to the next level.
And hey, don’t be afraid to experiment—after all, photography is all about learning, adapting, and finding new ways to express your vision through light.

