Hey, guys! Just got your first camera, or maybe you’ve been dabbling with photography but still feel a bit lost with all the buttons and menus? No worries! Everyone starts somewhere, and today, I’ll walk you through the basic camera settings step by step.
This guide will help you understand your camera better, so you can focus more on capturing the moments and less on stressing about the technical stuff. So, lets start to setting your camera to get the best result..
Common Camera Settings for Beginners
Let us first review some of the camera settings that ought to apply to any current digital camera. Since they are very universal across many camera manufacturers and models, you should be able to locate all the options shown below:
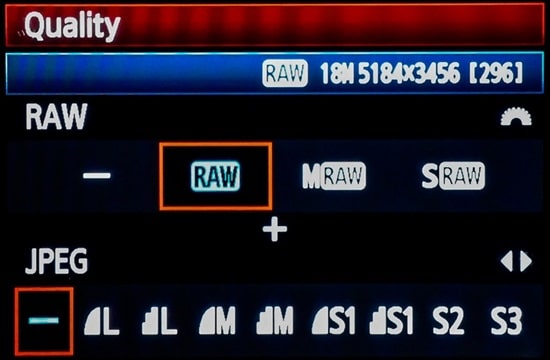
- Image Quality: RAW
- RAW Recording: Lossless Compressed (if available)
- White Balance: Auto
- Picture Control / Picture Style / Creative Style / Film Simulation: Standard
- Color Space: sRGB
- Long Exposure Noise Reduction: On
- High ISO Noise Reduction: Off
- Active D-Lighting / DRO, HDR, Lens Corrections (Vignette Control, Chromatic Aberration Control, Distortion Control, etc): Off
1. Camera Setup
Alright, first things first—let’s talk about the essential settings you need to tweak as soon as you unbox that shiny new camera. Think of this as setting the foundation, kinda like warming up before a big game.
These settings might feel overwhelming at first, but trust me, they’ll make your life a whole lot easier down the road.

When it comes to image quality, go for RAW. Why? RAW captures all the data from your camera sensor without compressing it, meaning you get maximum detail and flexibility when editing.
It’s like having the original master copy of a song—you can tweak the colors, exposure, and more without compromising quality.
If your camera offers Lossless Compression for RAW files, enable it. This way, your files take up less space without sacrificing detail.
Set your White Balance to auto unless you’re shooting in tricky lighting conditions. With RAW, you can adjust it later during post-processing, so don’t sweat it too much.
For Picture Style, choose standard to get a neutral look on your camera’s display—this won’t affect your RAW files but helps preview shots more accurately.
Turn on Long Exposure Noise Reduction if you’re into night photography or shooting long exposures. This will help reduce the ugly grain in your photos.
But turn off High ISO Noise Reduction—this can mess with image sharpness, and you’re better off handling it yourself during editing. Keep those lens corrections off too—they don’t impact RAW files, so no need to let the camera slow down your shooting process.
2. Ideal Camera Shooting Mode
Let us now discuss modes of shooting. People have said, “Always shoot in Manual Mode”. To be honest, though, you do not immediately need to delve into handbooks.
Let modern cameras handle some of the heavy work while you concentrate on composition and narrative since they are so clever.
Starting with Aperture Priority is among the simplest ways available. Here the camera automatically changes the shutter speed and you set the aperture, which determines background blur and how much light passes into the lens.
For portraits, this setting is ideal; a wide aperture (such as f/1.8) will elegantly blur the background and highlight your subject.
Just adjust the Exposure Compensation option to correct if your photo comes out either too bright or dark. Aperture Priority is so great because it allows you creative freedom without overloading you.
Using the Scene Modes on your camera—such as Sports or Fireworks—may be enticing, but these settings differ camera to camera. Furthermore lacking in many professional-grade models are these.
No matter what camera you upgrade to in the future, knowing the fundamentals of Aperture Priority or Shutter Priority can help you more wisely down road.
3. Best Autofocus Mode
Next up, autofocus! Different situations call for different autofocus modes, and choosing the right one can make or break your shot.

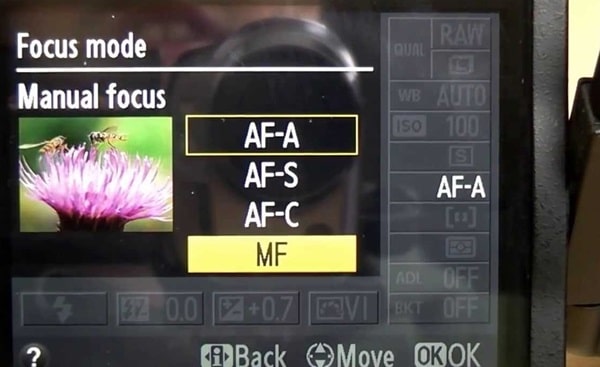
AF-S (Single Area Focus Mode): For Still Subjects
If you’re shooting something stationary—like a landscape or a posed portrait—go with AF-S (also called One-Shot AF on Canon cameras). This mode locks focus as soon as you press the shutter halfway.
It’s great when your subject isn’t going anywhere, and you want to ensure your focus is sharp and precise.
AF-C (Continuous Focus): For Moving Subjects
When your subject is on the move—think sports events or a dog running at the park—switch to AF-C (Continuous or AI Servo Mode). This mode keeps tracking the subject as it moves, so your focus stays sharp even in action-packed moments.
AF-A (Hybrid Mode)
If you’re not sure whether your subject will stay still or move, many cameras offer a hybrid mode—AF-A (on Nikon) or AI Focus AF (on Canon). This mode intelligently switches between AF-S and AF-C as needed.
It’s a handy option for beginners still learning to switch modes quickly.
4. Best Metering Mode
Metering is all about how your camera determines the right exposure. You’ll find several metering modes on your camera, and choosing the right one can drastically affect your photos.

For most situations, stick with Matrix (Nikon)/ Evaluative Metering (Canon). This mode analyzes the entire scene and tries to give you the best-balanced exposure.
It’s reliable and works well for beginners, especially when you’re still learning to control exposure manually.
If you’re shooting a subject with tricky lighting—like a person standing under a spotlight—you might want to switch to Spot Metering. This mode measures light only from a small area, usually the center of the frame.
Center-Weighted Metering, on the other hand, gives more importance to the center area but still considers the surrounding scene. It’s useful when your subject is in the middle of the frame, and you want to make sure they’re correctly exposed.
5. Best Lens Aperture
Alright, let’s discuss aperture, people! Since it not only regulates the light entering the lens but also influences the blurriness or sharpness of your background, this is among the most interesting places to play with.
We refer to this as depth of field—that portion of the image that maintains focus against the dreamy, blurry parts.
Use a wide aperture like f/1.8 or f/2.8 if you enjoy doing portraits and wish for a creamy, blurred backdrop (also called bokeh). This helps your subject to be truly unique by separating it from the surroundings.
Keeping the aperture at f/1.8, for instance, will produce a good background blur while maintaining your subject clear and sharp if you are using a 50mm f/1.8 lens.
Imagine, then, that you are capturing a breathtaking scene and wish everything to be in focus—from the flowers just in front of you to the mountains far off. Under such circumstances, choose a smaller aperture, like f/8 or f/16.
Although a lower aperture guarantees that the whole scene stays sharp, you might have to change your shutter speed or ISO to maintain the well-exposed photo since less light enters the camera.
The challenging aspect of aperture is matching it with the light at hand. Excellent for low-light situations, a wide aperture (f/1.8) allows in a lot of light.
To prevent overexposing your photograph, though, you will have to stop down to a smaller aperture if you are shooting outside on a brilliant day. Here the interaction of aperture, shutter speed, and ISO—the exposure triangle—comes into action.
6. Best Shutter Speed
Let us now turn now to shutter speed, which determines the length of exposure of the sensor of your camera to light.
Consider it as opening and closing a door: while a slow shutter speed keeps the door open longer, letting more light to enter and capturing motion, a fast shutter speed swiftly captures a brief point in time.
Fast Shutter Speed to Freeze Motion (1/1000s or Faster)
To freeze the action when capturing fast-moving subjects—such as sports events or children running about—you must have a quick shutter speed. Something like 1 in 1000s or even faster will guarantee that your subject remains sharp free from motion blur.
If you are doing street photography or wildlife photography, where the action occurs in a flash of an eye, this is particularly crucial.
Slow Shutter Speed for Motion Blur (1/30s or Slower)
Conversely, use a slow shutter speed—something like 1/30s or even a few seconds—if you wish to capture the beauty of motion, such as the flow of water in a cascade or automobile lights trailed through the night.
The dreamy, blurry impression results from more movement recorded in the frame while the shutter stays open. Simply said, you will most likely require a tripod to keep the camera stable and prevent inadvertent blur from hand movement at slow shutter rates.
Should it be too dark and you be obliged to use a slow shutter speed, camera wobble could result. On the other hand, your rapid shutter speed could cause the image to be too dark if it is overly brilliant.
More on that next; aperture and ISO come in to assist balance the exposure here.
7. Best ISO Setting
ISO shapes the light sensitivity of your camera. A lower ISO indicates that your camera is less light sensitive, thereby resulting in less noise or grain in the photographs.
In low-light conditions, however, you may have to raise the ISO to make your subject clear—though this could cause unwelcome noise in your pictures.
Use the Lowest ISO Possible (ISO 100 – 200)
Keeping your ISO as low as feasible always makes sense for the best image quality. ISO 100 or 200 is perfect if you are photographing outside in brilliant daylight since it maintains image sharpness and noise free.
When you have enough natural light to correctly expose your shot, this environment performs wonderfully without having to raise the ISO.
Raising ISO in Low-Light Situations (ISO 800 and Above)
You might not have the luxury of a low ISO when photographing indoors or in low-light conditions. Under these circumstances, you will have to adjust your ISO to perhaps ISO 800 or above.
Just be advised that your photographs will get more grainy the higher you drive the ISO. Although some contemporary cameras manage high ISO settings really effectively, it is still advisable to maintain it as low as the circumstances allow.
Should you indeed produce any noise, relax! Many editing applications, including Photoshop or Adobe Lightroom, provide noise-reducing capabilities to help your photographs look better.
But by properly regulating ISO, aperture, and shutter speed, one aims to avoid noise in the first place.
Conclusion
There you have it, guys—your essential guide to mastering aperture, shutter speed, and ISO! Photography is all about finding balance between these settings, and the more you practice, the more natural it will feel.
Remember, photography is a journey—there’s no right or wrong way to shoot as long as you enjoy the process. Play around with these settings, experiment with different scenes, and most importantly, have fun along the way.

