One basic camera option that directly affects your photo brightness is ISO. Knowing how ISO works will enable you to manage difficult lighting conditions and produce amazing images regardless of your level of experience with cameras.
This lesson will walk over ISO, when to apply it, and how it affects your final photographs.
What is ISO?
ISO is one of the simplest but most powerful settings on your camera. In basic terms, ISO controls how bright or dark your photos turn out. The higher the ISO number you use, the brighter your image becomes.
This can be super helpful when you’re shooting in low-light conditions, like at night or indoors, and you don’t want to use a flash or drag around a tripod.
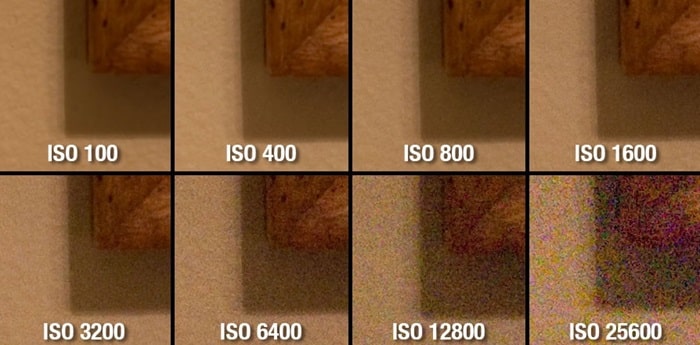
But, as with most things in photography, there’s a catch. The more you crank up that ISO, the more noise or grain creeps into your photo, which can make it look messy and lower the image quality.
So, raising ISO is all about finding the right balance. You’ll need it when conditions force you to, but you want to avoid overusing it to keep your photos crisp and clean.
Trying to capture the band in action, but you don’t have much light. A longer shutter speed would just result in a blurry mess because of all the movement on stage.
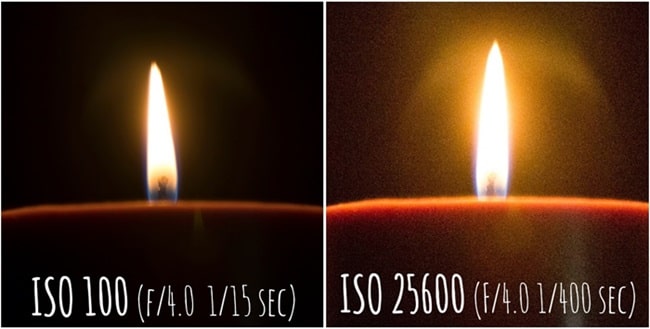
That’s where ISO swoops in! By increasing your ISO, you can brighten your photo without slowing down the shutter, keeping the action nice and sharp.
It’s not just for night photography, either. If you’re shooting sports or wildlife, where fast-moving subjects are the norm, bumping up the ISO helps you keep a fast shutter speed while still getting a properly exposed image.
But here’s the thing: High ISO is affect noise, which looks like those tiny colored dots or grains that muddy up the photo. That’s why experienced photographers only raise the ISO when other options won’t work, like when using a wider aperture still isn’t enough to capture the shot.
What Does ISO Mean?
Fun fact: ISO has nothing intrinsically photographic in reference. It stands for the International Organization for Standardization, a group in charge of industry-wide standard setting.
You may be wondering, “Okay, but what does that have to do with my camera?” Good inquiry! Two classic movie standards—ASA (used in the US) and DIN (used in Europe)—were combined under the ISO system back in 1974 to provide a worldwide film sensitivity standard.
This guaranteed everyone was on the same page regarding how ‘sensitive’ a movie was to light, therefore simplifying things everywhere.
By now we live in the digital age, and camera makers followed the same ISO scheme. This guarantees that ISO 100 on your DSLR or mirrorless camera generates brightness comparable to ISO 100 film from back-in-the-day.
Whether they shoot film or digital, this standardizing enables photographers to provide uniform results across many media.
Understanding ISO Values
Most cameras offer a range of ISO values that allow you to adjust your photos according to the lighting conditions. Here are some common ISO settings you’ll likely come across:

- ISO 100 (Low ISO, ideal for bright conditions)
- ISO 200
- ISO 400
- ISO 800
- ISO 1600
- ISO 3200
- ISO 6400 (High ISO, useful for low light but with more grain)
The concept here is simple: Doubling the ISO doubles the brightness of your image. For example, a photo shot at ISO 400 will be twice as bright as one taken at ISO 200, and four times as bright as one at ISO 100.
What is Base ISO?
Now let’s talk about the base ISO—which is basically the lowest native ISO your camera offers. This setting is essential because it gives you the cleanest image possible with the least amount of noise.
Most modern cameras, like Canon, Sony, or Nikon DSLRs, have a base ISO of 100. Meanwhile, some older models, or specific ones like the Fuji X-T2, have a base ISO of 200.
The golden rule? Stick to your base ISO whenever you can to get the best image quality. In well-lit conditions, like when you’re shooting outdoors on a sunny day, there’s really no reason to raise your ISO above 100 or 200.
This way, you avoid introducing unnecessary grain into your photo.
Of course, in low-light situations, staying at the base ISO may not be practical. For instance, if you’re shooting at night without a tripod, you’ll need to increase the ISO to get a properly exposed image without a blurry mess.
It’s all about knowing when to compromise—sharpness with some noise is often better than an underexposed or blurry photo.
Low vs High ISO: Why Noise Matters
What then precisely is noise, and why is it such a big deal? Particularly in the darker parts of the picture, noise describes those minute specks or grainy textures that show up in your images.
The camera sensor magnifies the signal to brighten the image when you turn up the ISO to 3200 or 6400, but that amplification also brings noise.

One simple approach to picture it is as follows: Say you are photographing two pictures of the same scene. One at ISO 200 during extended exposure and another at ISO 3200 under higher shutter speed.
Sure, the ISO 3200 image will be brighter than the ISO 200 picture, but it will also show more obvious noise.
To keep their photographs clear and noise-free, photographers thus aim to avoid high ISOs wherever possible. Sometimes, though, utilizing a high ISO is the less of two bad choices.
Still better than one that is totally out of focus or too dark to plainly view is a picture with some grain.
How to Change ISO
Changing ISO might seem a bit tricky at first, especially if you’re new to photography, but don’t worry—once you get the hang of it, it’ll become second nature. How you change ISO depends on the type of camera you have, and each brand may handle it a little differently.
Step 1: Exit Auto Mode

First things first, you’ll need to switch out of Auto mode. In Auto mode, the camera makes all the decisions for you, including the ISO, which takes away the creative control you need.
To set your own ISO, switch to one of the manual or semi-manual modes. Here are your main options:
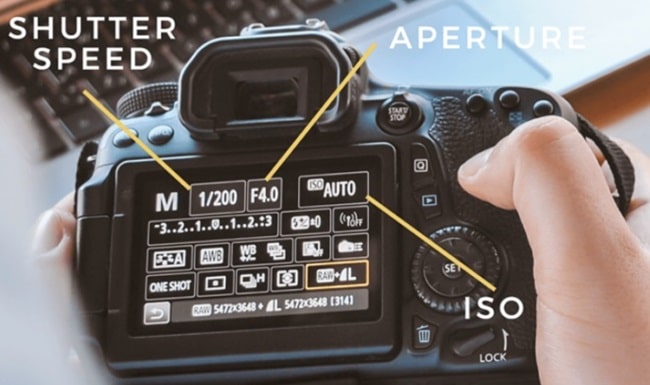
- Manual Mode (M): You control everything—aperture, shutter speed, and ISO
- Aperture Priority Mode (A/Av): You set the aperture, and the camera takes care of the shutter speed. Great for portrait and landscape shots
- Shutter Priority Mode (S/Tiv): You control the shutter speed, and the camera handles the aperture. Perfect for action or sports photography
- Program Mode (P): The camera selects both aperture and shutter speed, but you can still tweak the ISO and other settings
Most photographers prefer using Aperture Priority or Manual mode because they offer more control without being overwhelming.
Step 2: Finding the ISO Setting
Depending on the type of camera you’re using, adjusting the ISO can vary. Below are the common ways to find and change the ISO on entry-level, mid-range, and high-end cameras.
a. Entry-Level DSLRs and Mirrorless Cameras
For beginner cameras, ISO adjustments are usually found in the quick menu. Here’s how to do it:
- Press the Menu or Q button (depending on your camera model)
- Navigate to the ISO section using the arrow keys or the control dial
- Select the ISO value you want, or set it to Auto ISO if you want the camera to handle it
While these cameras often hide ISO deep inside menus, once you get familiar with the layout, switching ISO values becomes much easier. Some models even let you customize buttons so you can reach the ISO setting faster.
b. Mid-Range and High-End Cameras
If you’ve got a more advanced camera, chances are there’s a dedicated ISO button right on the body. This button makes changing ISO quick and seamless.
Here’s how it works:
- Press and hold the ISO button (usually located on the top or back of the camera)
- While holding the button, turn one of the control dials to adjust the ISO value
If your camera doesn’t have a dedicated ISO button, don’t worry—many models let you assign one of the other buttons to perform this task. Check your camera’s manual to see how to customize controls for quicker access.
c. Cameras with Dedicated ISO Wheels
Some cameras, especially retro-style mirrorless models, feature a physical ISO wheel. This design makes things super easy—you just turn the wheel to the desired ISO value without fiddling through menus.
This type of control is great because you can adjust the ISO by feel, even without looking at the screen.
Step 3: Practice Switching ISO Quickly
Getting used to adjusting your ISO on the fly is essential, especially if you shoot in changing light conditions. For example, imagine moving from a bright outdoor space into a dimly lit room—you don’t want to miss a shot because you’re stuck navigating menus.
Spend some time practicing ISO changes so you can do it without thinking. Also, keep your camera manual handy if you’re still unsure how to adjust the ISO setting on your specific model.
Each brand—like Canon, Nikon, Sony, or Fujifilm—may have slightly different controls, so knowing where everything is will make your life much easier.
When to Use Low ISO?
Whenever possible, stick to the lowest ISO setting on your camera (usually ISO 100 or 200). Here’s why: Low ISO produces the cleanest image with minimal noise.
In bright conditions—like when shooting outside on a sunny day—there’s no reason to raise your ISO. Lower values ensure your photo stays crisp and free from those pesky grains.
Even in low-light conditions, you might still be able to use a low ISO. For example:
- Using a tripod:
If your camera is mounted on a tripod or placed on a steady surface, you can opt for a longer shutter speed to brighten your image, avoiding the need to increase ISO. Since the camera won’t shake, you don’t have to worry about motion blur. - Stationary subjects:
If the subject isn’t moving (like a still life or landscape), you can safely use a low ISO and brighten the photo using other settings.
In short, low ISO is your go-to when you have plenty of light or a stable setup, keeping your photos as clean and sharp as possible.
When to Use High ISO?
Now, let’s talk about the situations where high ISO becomes necessary. While you want to avoid raising ISO whenever possible, sometimes you have no other choice.
Here are some scenarios where high ISO saves the day:
- Shooting in low light:
Whether you’re photographing indoors, at night, or in dim environments, increasing the ISO can help you capture a properly exposed image without needing a flash. - Capturing fast-moving subjects:
In sports, wildlife, or street photography, you need a fast shutter speed to freeze motion. Raising the ISO ensures your image stays sharp, even if the lighting isn’t ideal. - Handheld photography without a tripod:
If you’re shooting without a tripod, increasing the ISO allows you to use a faster shutter speed, reducing the chance of camera shake.
Sure, high ISO introduces grain and noise, but sometimes it’s a fair trade-off. A sharp photo with some noise is still better than a blurry one where the subject is lost in motion.
Conclusion
Learning how to modify your ISO will enable you to more creatively manipulate your images. Knowing when to raise or reduce your ISO will make a big difference in your photos whether your shooting in dark indoor environments or brilliant daytime.
The most important lesson is Whenever you can, stay with low ISO to preserve the greatest image quality. But don’t hesitate to bring it up when the circumstances call for it; better still, have a clear, somewhat noisy picture than a fuzzy one.
Changing ISO will become second nature with some repetition; you will be able to make fast changes without even considering about.
So grab your camera, get out of Auto mode, and start playing about with ISO right now. Practicing will help you to become more intuitive; soon enough, changing ISO will be only another instrument in your toolkit for creativity.

