Have you ever taken a picture, excited to capture the moment perfectly, only to realize later that it turned out blurry? Well, you’re not alone! Getting sharp, crisp photos can sometimes feel tricky, especially when you’re just starting out.
But don’t worry—there are a few simple tips and tricks that can make a huge difference. Whether you’re snapping pictures with your DSLR or a mirrorless camera, I’ve got some easy-to-follow advice that’ll help you get those sharp photos you’ve been dreaming of.
How to Get Sharp Photos
1. Set the Right ISO
Alright, let us first address the fundamentals—ISO settings. Consider ISO as the sensor’s sensitivity of your camera toward light.
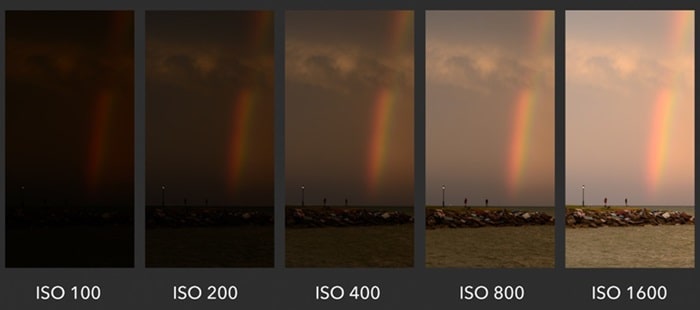
Great for clear, noise-free images in favorable lighting, your camera is less sensitive to light the lower the ISO setting. But the sensitivity of the sensor rises as the ISO value rises, enabling you to shoot in darker surroundings.
The difficulty is that although a higher ISO will enable you to capture images in low light, it also brings something known as “noise”, which could cause your images to seem grainy and less sharp.
I so advise beginning with the lowest ISO possible—usually around ISO 100 or 200—then only raising it when absolutely necessary.
Pro tip: Keep to the lowest ISO if you are photographing outdoors during daylight. Start progressively raising the ISO step by step, though, if you are indoors or the light is diminishing to maintain everything crisp.
2. Use the Hand Holding Rule
Let’s discuss camera holding—something that sounds simple but makes a world of difference regarding shot quality. The hand-holding rule is a basic guideline that will help you prevent unsteady hands from ruining your photos.
Your shutter speed should either match or surpass the focal length of your lens. Given a 50mm lens, your shutter speed should be at least 1/50 of a second.
Should you have zoomed in to 125mm, you will desire at least 1/125 of a second shutter speed. Sounds easy right? If you have a cropped sensor camera, well, there is a little more involved.
For a 1.5x crop factor Nikon camera, for instance, multiply the focal length by 1.5. To prevent any blurring, then, using a 125mm lens on a Nikon you would really want a shutter speed of about 1/200 of a second.
Not to worry; once you acquire the feel of it, it will become second nature and your handheld images will come out far more sharply!
3. Choose Your Camera Mode Wisely
Getting clear images also depends critically on selecting the correct camera mode. Aperture Priority (A or Av mode) is one of the greatest ways to operate in low light conditions or while attempting limited illumination photography.
While your camera automatically changes the shutter speed to obtain the correct exposure, this mode lets you select the aperture. However, the more light you let into the camera the wider your aperture (lower f-stop value), which is fantastic for maintaining shutter speed quick enough to prevent blur.
Conversely, if you want more of the subject in focus and you are shooting in a highly illuminated setting, you may wish to slightly close the aperture a touch (up the f-stop number) for a sharper image.
Pay most attention to your metering mode. For customers of Nikon, I advise using Matrix Metering; for Canon, Evaluative Metering.
This mode examines the entire scene so your camera can evaluate how best to expose your picture.
4. Pick a Fast Enough Shutter Speed

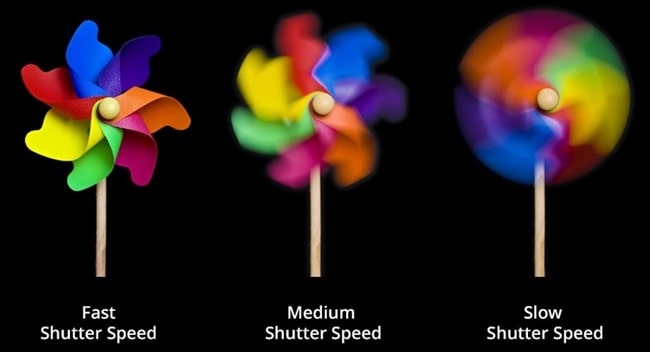
Usually, the secret to great pictures is rapid shutter speed. If your shutter is open for too long, even the smallest movement—that of your subject or yourself—may cause blurring of the images.
How therefore should one choose the correct shutter speed? For handheld photographs, keep it above 1/100 of a second generally speaking.
You will want to raise your shutter speed to freeze that motion if you are photographing something fast—such as children running, cars, or even simply someone walking briskly. Try one in 200 or one in 500 of a second.
You should start searching for more light, though, if your shutter speed is less than 1/100. If you must, open those windows, switch on some lamps, or even employ a flash.
And don’t hesitate to turn up the ISO a little—but not too much—remember the noise? To keep your images good and sharp, it’s all about striking the ideal mix between ISO, aperture, and shutter speed.
5. Use High ISO in Dark Environments

Ah, the difficult realm of low light photography! Trying to keep your ISO low will help you prevent noise when shooting in a dimly lit environment or outside late at night. Sharpness should, however, be your first concern; occasionally, this means raising your ISO to obtain a faster shutter speed.
How then should one handle the noise? Usually you may go up to ISO 1600, 3200, or even higher without compromising your image since today’s cameras manage high ISOs far better than they did years ago.
Indeed, you will get some grain; nevertheless, a sharp, somewhat grainy image is preferable to a hazy one devoid of information.
The positive news Use a higher ISO when you need to; post-processing tools like Adobe Lightroom can help to lessen some of that noise after the fact. Later on, your sharp pictures will be much appreciated!
6. Enable Auto ISO

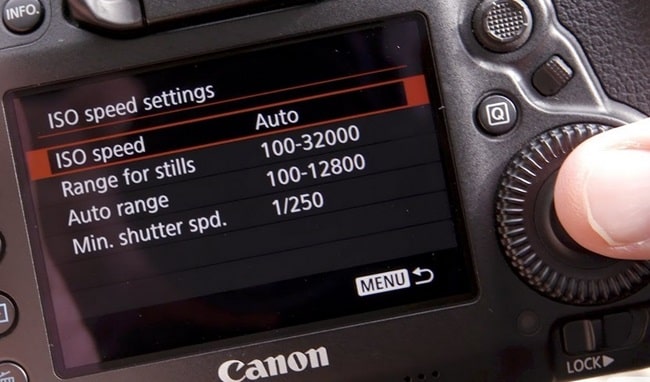
Auto ISO could well become your new best buddy if you have ever battled to select the correct ISO setting on the run. Imagine it as having a personal assistant for your camera; it automatically changes the ISO for you so you may concentrate on getting the ideal photo.
It works like this: Based on available light, Auto ISO allows your camera determine when to increase the ISO. When you’re shooting in conditions where the light changes quickly, such as from indoors to outdoors or in shaded places, it’s very beneficial.
All you have to do is choose a minimum shutter speed so your photographs remain crisp and choose a maximum ISO limit to prevent too much noise. Your camera will handle the rest once that is done.
Assume you are documenting a birthday celebration here. Inside the lights are low, but occasionally you step outdoors to get some group photographs. Auto ISO takes control and sets your ISO for you rather than you changing it each time the light changes.
It’s a superb approach to guarantee your images remain sharp and well-exposed without having to deal with continual adjusting. It’s like letting your camera handle some of the work so you might concentrate on composition and timing.
7. Keep Your Camera Stable
Among the quickest ways to ruin a really nice picture? Camera shaking. Particularly when you’re shooting with slower shutter speeds, blur can result from even the smallest motion.
Still, there are some basic methods to keep your camera stable and prevent shaky images.
Let’s begin with posture first, make sure your stance is stable and balanced as you hold the camera. To help, keep your feet shoulder-width apart and tuck your elbows tight to your torso. See yourself as a statue—rigid and still. Sharper the shot the less movement there is!
Hold your camera with both hands then, one hand should hold the camera body; the other should assist the lens. This helps you to stabilize the camera from two places, so lowering the motion risk.
And gently push the shutter button when you are ready to shoot. Though little, if you touch too hard you can move the camera just enough to blur the picture.
Consider using a tripod or even leaning against a solid surface like a wall or table to assist stabilize yourself if you are shooting in poor light or with a slow shutter speed (below 1/100 of a second).
And just like you would if you were shooting a gun, don’t hesitate to inhale deeply, exhale gently, then click the shutter. Though it seems ridiculous, it works!
8. Focus Carefully on Your Subject
The secret of focus is that your image won’t be sharp even if you get everything else perfect—ISO, shutter speed, aperture. Getting a perfect picture depends mostly on focus, hence understanding how to master it will greatly improve your photography.
Usually if you are photographing people, concentrate on the most crucial component of your shot while you are shooting. Usually this is the eyes of the subject. Most contemporary cameras provide range of focus modes.
Usually the best option for still subjects is Single Point AF since it lets you choose exactly where the camera focuses. Should your subject be moving, change to Continuous AF to monitor it and maintain sharpness of your subject.
One typical error photographers make is unintentionally focusing on the incorrect area of the scene. Perhaps you are shooting a person, but the camera locks on the background rather than the face.
Use the focus points of your camera to manually choose where you wish the image to be sharpest. Nailing the focus is much more important if you are using a short depth of focus (wide aperture) since just a small area of the image will be in focus.
Remember also to double-check your focus after you grab the shot. View the picture at 100% on the LCD screen by using the zoom feature of your cameras.
This helps you to ensure that everything you wish is sharp before turning to the following shot.
9. Reduce Motion Blur in Your Subject
Motion blur can either be your worst enemy or your best friend, depending on the look you’re going for. If you’re after sharp, clear images, though, you’ll want to minimize motion blur in your subject, especially if they’re moving.
When photographing a moving subject—whether it’s a person walking or a car zooming by—the key is to use a fast enough shutter speed. The faster the shutter speed, the less chance there is for motion blur.
As a general rule, if your subject is moving quickly, aim for a shutter speed of 1/500 of a second or faster. This will freeze the action and give you a sharp image.
But sometimes, a little bit of motion blur can add an artistic touch to your photos. For instance, if you’re shooting a cyclist or a running dog, you can use a technique called panning.
This involves following the subject’s movement with your camera as you take the shot, keeping the subject in focus while the background blurs to create a sense of speed and motion. It takes a bit of practice, but when done right, it looks incredible!
However, if you’re photographing a person or a pet in a portrait setting, ask them to stay still for just a moment while you snap the shot. Even small movements, like someone shifting their weight or turning their head, can create unwanted blur.
Just remember, freezing motion is all about finding the right shutter speed for the situation.
10. Use a Faster Lens
Finally, if you’re serious about getting the sharpest images possible, investing in a faster lens can make a big difference. When we say a lens is “fast”, we’re referring to its ability to open up to a wide aperture (low f-stop number), which lets in more light.
The more light your lens can let in, the faster your shutter speed can be, and the sharper your images will be—even in low-light situations.
Prime lenses (those that don’t zoom) are often faster than zoom lenses. For example, a 50mm f/1.8 lens is considered a great budget-friendly option for achieving sharp images with beautiful background blur (or bokeh).
The wide aperture not only helps with sharpness but also adds a creamy, out-of-focus background, making your subject pop.
Using a fast lens is especially useful for indoor or night photography, where natural light is limited. It allows you to shoot at faster shutter speeds without having to increase your ISO too much, which in turn keeps your images clean and sharp.
Trust me, once you start using a faster lens, you’ll notice the difference right away!
Conclusion
Getting sharp photos takes a bit of practice, but once you master the basics like setting the right ISO, holding your camera steady, choosing the correct focus, and understanding shutter speed, you’ll be well on your way to capturing stunning, clear images.
And if you really want to take your photography to the next level, don’t underestimate the power of investing in a fast lens—it’s a game-changer!
So, whether you’re photographing a fast-moving subject or simply trying to avoid blurry vacation photos, these tips will help you sharpen your skills (pun intended!).

